ActivityProfessional.Com Login


renewal cycles. Complete
some now & some later.
and Get 25% off
the Total price!
Buy 3 Courses
and Get 30% off
the Total price!
Buy 4 Courses
and Get 35% off
the Total price!
| Create Account | Login | |


Section 19
Visual Aid
Table of Contents | NCCAP/NCTRC CE Booklet
 a. Demonstration with a Visual Aid
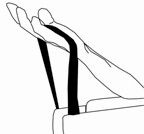
Use of a Visual Aid and Use of Thera-Band
This section explains how the use of showing an object to a resident, i.e. a visual aid, can act as a motivator. If you have already viewed the DVD, you are aware that Inner Tube Tire Stretching is suggested. As you are aware, since tires are tubeless, you will have a problem acquiring car tire inner tubes from a junkyard. Thus, for inner tube tire stretching you might use Thera-Band which is an occupational therapy material, which can be purchased from the Internet. Also, a fabric store may have wide elastic that has a stretch with resistance low enough for your resident's muscular ability. However, Thera-Band is preferable over elastic from a fabric store, because it can be purchased in varying levels of resistance. Thera-Band is also relatively inexpensive. Thus, it is not cost prohibitive to leave in resident’s rooms for CNA use.
b. Role Play Illustrating Benefits of a Visual Aid
The following is a review of the role play on the DVD. The order of these steps will vary as well as the number of steps depending on the mental and physical ability of your resident. As you read through these, recall the demonstration on the DVD. Then, consider for which of your residents Thera-Band stretching would be appropriate.
1. Introduction: “Hello, my name is Cathy."
2. Observation: "You know I’ve notice that you always sit out here in the hallway, and you never move your hands."
3. Ask for Feedback: "Have you ever noticed that? Your hands always seem to be just like that on your lap."
4. Provide Information: "You know when I don’t move my hands very much they get kind of stiff and sore."
5. Ask Permission: "I’m wondering if I could touch the back of your hand and see if it is cold or not? Would that be okay with you if I touched the back of your hand? Let’s see if I can do that."
6. Explain what you are doing: "This is my hand right here, I’m going to take my hand and I’m going to touch the back of your hand just like this. You know, I noticed your hands were really cold."
7. Demonstrate with a Visual Aid: (Was missing from the first role play to illustrate the benefit of a visual aide as a means to motivate a resident.)
8. Request to do the Activity: "I’ve got a piece of inner tube (Thera-Band) I’d like you to stretch. You want to do that don’t you?”
Step 7 above was missing in the first role play shown on the DVD. The point on the DVD was to illustrate that you have a greater potential of a resident becoming involved if you show them what you want them to do, rather than just telling them. Then show the inner tube (Thera-Band) to her. You’ll have a lot harder time motivating somebody by telling them rather than showing them.
Here's a review of the second DVD role play. This is the next day. As you can see the order and the number of steps vary from the preceding example. This is clearly a flexible model for motivating to do an activity via the use of Demonstration.
1. Introduction: “I’m Cathy and you probably don’t remember me from yesterday, but we were talking about your hands."
2. Demonstrate with a Visual Aid: "And I’ve got this hand exercise, you stretch this and it gets your hands moving. I talked to nursing and they said that they’re concerned that your fingers are getting stiff."
3. Request to do the Activity: "I am wondering if you would stretch this for me? Think you’ll do this for me, okay?"
4. Explain what you are doing: "I’m going to take your hand right here and turn it over, see if I can do this, let me turn this over. This is a piece of rubber I’m going to put in your hand. This is an exercise."
5. Reinforce: "Good job! Now just close your fingers around it and we’re going to have to stretch this as an exercise.”
 c. Can Rolling - Demonstrate with a Visual Aid
Here is how the preceding steps in using a Visual Aid would apply to the implementation of an activity like Can Rolling. Can Rolling is explained in Volume One of this series in detail.
1. Introduction: “Hi, my name is Cathy. Gee, you have a nice smile."
2. Observation: "Effie would you lie your hand flat in mine?" (Resident's hand is slightly cupped.)
3. Share Assessment: State, "Your hand seems cold to me."
4. Working surface: Provide over-the-bed-table.
5. Motivation: "Let me give you a hand exercise to do today.”
6. Request to do the Activity: “Is that okay with you? Would you like to do a hand exercise?"
7. Demonstrate with a Visual Aid: Roll a Pringles can on a towel placed on the over-the-bed-table to show Effie how Can Rolling is done.
8. Explain the Activity: "This activity is a good exercise for your hands." If she is alert enough, continue by stating, "When you move your hands the blood vessels squeeze the blood through more freely and your hands become less stiff and cold."
So the idea of a visual aid regarding Can Rolling, is to show the resident a piece or a part of what you want him or her to do and there is more of a chance that he or she will become involved.
Goal: To do Can Rolling independently once started…
Approach: To motivate by explaining the benefits of Can Rolling...
NCCAP/NCTRC CE Booklet
Forward to Section 20
Back to Section 18
Table of Contents
Top