renewal cycles. Complete
some now & some later.
and Get 25% off
the Total price!
Buy 3 Courses
and Get 30% off
the Total price!
Buy 4 Courses
and Get 35% off
the Total price!
| Create Account | Login | |

Section 25
Stenciling
Table of Contents | NCCAP/NCTRC CE Booklet
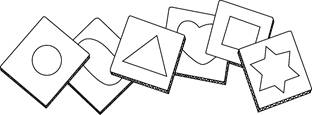
When I refer to Stenciling, I’m talking about the method of stenciling, by which you cut a shape out of the center of a piece of cardboard. The resident then traces inside of the shape that you have cut out. In my Stenciling set, I have six different shapes. My set is illustrated here, as well as in photos included on the last track of the DVD that accompanies this course. Pieces of corrugated cardboard can be six-inch squares with construction paper glued to them. By having the corrugated cardboard covered with construction paper, the resident is more likely to see the shape against the white paper upon which the stencil is to be traced.
Observe and Assess!
The following shapes are listed in order of difficulty, from the easiest to the hardest.
 1. Circle
2. Oval
3. Heart
4. Triangle
5. Square
6. Star
Construction of the Circle Stencil
1. Glue construction paper to the top surface of the six-inch squares of corrugated cardboard.
2. Trace around perhaps the bottom of a paper cup to acquire your circle shape.
3. Then use a pair of scissors to cut out this geometric shape. You might use a steak knife to poke a hole in the middle of the circle, in which to slide the point of your scissors. Then cut in a spiral out to the line you have drawn for you circle shape.
4. In addition to this, put clear contact paper over the top to create a more durable surface. Granted the inside edge of the shape is not exactly smooth, but with this level of resident, perfection is not needed, nor is it noticed by the resident. The benefits of the thickness of the corrugated cardboard by far out shadow your possible inability to cut a perfectly smooth circle. You will be more likely to leave this in the resident’s room if you mass-produce these and have a ready supply to replenish projects lost in resident’s rooms.
Creativity!
As with the other activities, when introducing Stenciling to a resident, first get eye contact, and then get at eye level, assess your resident's mental ability and hand coordination. As mentioned earlier, oftentimes residents have a very weak grasp. Thus, for this activity, you might refer back to the idea of using a Styrofoam ball with a pencil pushed through it. Vary the diameter of the Styrofoam ball to accommodate the capability of your resident’s grasp so that the ball optimizes his or her ability to use the pencil. Just a reminder… Be sure, if you are right-handed, that you are standing to the resident’s right, so that when you stabilize the paper and corrugated cardboard Stencil, your arm will not be in your resident's line of vision.
1. Observe: You might say, “Hi, Mary. How are you today? My name is Cathy. I’ve got a project I’d like for you to try. Before we do that, would you mind putting your hand flat in mine?” Assess your Mary's ability to follow a simple request and her ability to move her hand. If you are uncertain about Mary's mental ability at this particular time of day, ask Mary a question, perhaps, regarding living in the area, then mention the name of the town, to assess her mental ability. As previously mentioned, while talking with Mary, continually assess her eye contact and her ability to focus and maintain attention.
2. Assess: Explain to Mary that you have a hand exercise for her to do. State, "This will help you to keep your hands moving." Place the sheet of typing paper on the over-the-bed-table or table or tray in front of her, making sure, of course, that the table is positioned at the lowest point so that it isn't touching her knees, but accommodating her possible elbow, shoulder, and wrist movements. Place the Stencil on top of the typing paper, and say something like, “Look at what I have here. Let me show you how this works.” Take the pencil and stencil around the inside of the geometric form, usually a circle first.
3. Creativity: Then state, “Let’s have you try. Let’s see how you do at this.” Then state, “Here, do you want to hold the pencil?” Assess if Mary is able to grasp the pencil independently and understand the simple request. If she is unable to hold the pencil, state, “Here, let me help you.” Then perhaps cup your hand around hers; assess for a Styrofoam Ball or other adaptation, etc.
4. Sensitivity: Next, give a compliment and say something like “Good, great, good job! You’re really able to hold the pencil well,” when, in fact, perhaps you are actually holding the pencil. Next, take her hand, and circle around the inside of the stencil, stating, “Good job, you really did well at this.” It helps to anchor the paper to over-the-bed-table with masking tape.
| Goal: To do Stenciling with total physical assistance… |
Goal: To do Stenciling independently once started… |
What "independently once started" means is once you get your Mary started doing the stenciling, perhaps she is able to make a few marks on the paper on her own. As you know, a suggested way to implement this into your One-to-One program is to get one resident started with the Stenciling, perhaps in the lounge as part of a Small Group, and then turn to another resident who may be sitting adjacent to them and start them on another One-to-One project. This way you can give constant prompting and praise to the first resident, whom you have started Stenciling with. Another way to revise the Goal, in addition to the level of physical assistance that you are providing, would be to increase the difficulty of the shape being stenciled.
| Goal: To Stencil a circle independently once started… |
Goal: To Stencil an oval independently once started… |
And then moving on up the scale of difficulty…
Observe and Assess!
The reason why the shapes fall into the above succession of difficulty levels is when Mary is Stenciling and she needs to change direction with her pencil, she may not be able to follow the inside edge of the Stenciling shape. The Heart Shape is a good example of this. She may either totally trail off the design or, for example, with the heart when she gets to the lower point of the heart. She may be unable to coordinate her hand movement or have the mental ability to change the direction of her pencil, which is stuck in this lower point. Or when Mary gets to the top point of the heart she may trail off into to the middle of the Stencil.
Chances are, if you have a resident who can do a complex star, they are able to do an activity of a more productive nature and also will need the motivation of seeing a finished product, perhaps decorations for the facility. If Stenciling is too difficult for a resident, you might try having them merely write their name or write numbers or letters on a paper as explained in a previous Section. Leave Stencil, writing implement, and paper in a labeled Activity Project Bag in the resident’s room.
Residents with whom to try Stenciling
| Resident | Who will gather materials and/or construct project? |
Staff /Volunteer to work with resident? When? |
|
|
|
|
|
|
Progress Note: See page 7 for details regarding this four-part implementation procedure, which can become the basis of a Progress Note, stating “When I tried Stenciling with _________________, the following occurred… |
1. Observation: |
2. Assessment: |
3. Creativity: |
4. Sensitivity: |
Culture Change Implementation: Place Stenciling in labeled Activity Project Bag left in resident’s room for CNA, volunteer, etc. use.
NCCAP/NCTRC CE Booklet
Forward to Section 26
Back to Section 24
Table of Contents
Top


