ActivityProfessional.Com Login


renewal cycles. Complete
some now & some later.
and Get 25% off
the Total price!
Buy 3 Courses
and Get 30% off
the Total price!
Buy 4 Courses
and Get 35% off
the Total price!
| Create Account | Login | |


Section 22
Concentration Game & Same and Different Cards
Table of Contents | NCCAP/NCTRC CE Booklet
Concentration Game
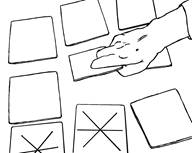 Moving up the Scale of Difficulty, if you have a resident with an attention span of at least a minute who can use at least one hand, you might assess him or her for the Concentration Game. The Concentration Game goes back to the game you may have played as a child with a deck of cards. You took a whole deck of cards and turn the cards face down and then in pairs turned cards up two at a time and tried to match the cards. Obviously most residents would not be able to handle an entire deck of fifty-two cards, nor have agile enough thumb and index finger movement to pick up thin playing cards. So consider making your own Concentration Game out of four inch squares of, you guessed it, corrugated cardboard. You then cover the corrugated cardboard with construction paper and clear contact paper. The problem with a Concentration Game you may buy from the internet is that the cards may be poster-board thick, and hard for residents with stiff fingers to pick up. Therefore you might paste your store-bought cards onto corrugated cardboard. However, I highly recommend making your own Concentration Game, because when you make your own set of cards from cardboard boxes and construction paper, they are free. Thus, you will be more likely to leave them in an Activity Project Bag in the resident's room available for staff, visitors, and volunteers to use with the resident.
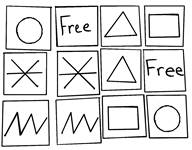 Here's how I made my set of Concentration Cards, of course there are numerous variations that work just as well. Make geometric marks with a felt pen on the construction paper glued to the corrugated cardboard. Then cover each card with clear contact paper. Each card has a geometric shape on it. Of course each shape is duplicated for matching in your Concentration Game. Some shapes you might include in your set, as illustrated, are: two circles, two zig-zagging lines, two triangles, two squares, and two stars. Make a star that looks like an asterisk, so it is made up of separate lines to give it an open shape, rather than a closed shape like the circle, triangle, and square. Thus you make an open star rather than a closed star, since a resident might confuse a closed star with a triangle. You also might include two cards that have the word “free” printed on them. These cards are free matches for your residents who are alert enough to be aware of the "free" card matching with any other card.
To introduce the Concentration Game to a resident, you need to…
1. First observe and assess whether your resident is able to differentiate between the shapes. Start with the two shapes that are the most different looking, which would be the asterisk, or I’ll call it a star, and the circle.
2. So after you have
a. introduced yourself
b. gotten eye contact
c. placed yourself at eye level with your Mabel
d. assessed where Mabel’s mental ability at this time of the day is
e. asked an open-ended question, for example, “Mabel what do you see here?”
3. Hold up or put on her over-the-bed-table the circle. Ask, “What does that look like to you?” Ideally she would say “That’s a circle.”
4. Then you say “What do you see here?” Next, show her the star, and hopefully she will say “That’s a star.” I worked with one resident and she called the star a “double cross,” so I called it a “double cross” rather than a star because that was her word and that’s how she referred to it.
5. With two and only two cards on the over-the-bed-table facing up, say, “Okay, well this is the circle and this is the star. Now let's see if you can remember where they are.”
6. Take both the circle and the star, and turn them face down. Of course, the back is identical brown corrugated cardboard.
7. Next ask, “Do you remember where the circle is? It’s hidden now.” Assess her ability. See if she is able to turn over the circle and then know that the remaining one is the star. Depending on how quickly she grasps this concept, you might repeat this procedure with two cards a few times, if needed.
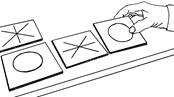
8. The next step is to add another card, place the circle card first, a star card in the middle, and a circle card last. Slowly, point to each shape and say their names. "This is a circle, this is a star, and this is a circle." If appropriate, trace your index finger along the shapes slowly. Make sure she is aware of, and recalls the shapes by doing the following.
 9. Say, for example, “Well let’s see what we have now. I’ve added one more." The way I am speaking is almost as if I’m exploring this for the first time in my own mind. Say, “Well let’s see what is this, this is a circle, and then let's see what’s this here in the middle, here’s the star, and on the end here’s another circle.”
10. Slowly, as if you are thinking this through for the first time, say, “Let’s see if I turn these over,” and flip all three over, “I’m wondering if you can find the star.” The star is the card in the middle. Assess your resident’s ability to select the star.
11. If she is successful at selecting the star, the next step I would do is add another star. So now you have four cards. Turn them all face up. Now one thing that’s important at this level of difficulty is that, when you add the fourth card with the star, keep your cards in an L shape. At the bottom of the L is a circle, a star and a circle. And then above the end circle to the left that’s where you put your star. I’ll explain why in a minute.
12. So you explain to the resident, “OK let’s see, we’ve got a circle,” and then tap that card, “and we’ve got a star," tap that card, "and a circle," tap that card, "and another star", tap that card. "Now let's see if we can find these.”
13. So then take all four cards, and turn them face down. Ask, “Where are the two stars at now?”
Observe and Assess!
The reason I had you put the four cards in an L shape rather than in a nice neat box, with two cards on the top and two cards on the bottom, is that with the L shape, I find the resident has more of a clue regarding the location of the two stars. Because the star is in the middle and it’s also in the top row to the left, this positioning makes it much easier for the resident to find. Thus, by having the cards in an asymmetrical shape, it makes it easier for your Mabel to find the star cards.
Creativity!
Remember the key is to provide the resident with a successful experience, so always be using your creativity to devise new and better methods to help your resident succeed!
| Goal: To identify two shapes in the Concentration Game, to name the circle and star… |
Goal: To find the star with three cards faced down… |
Goal: To find the star with four cards placed in an asymmetrical L shaped pattern… |
Goal: To play a Concentration Game with four cards in a symmetrical shape… |
Goal: To play a Concentration Game with five or six cards… |
Goal: To play a Concentration Game with a free card and eight cards… |
Creativity!
A possible Care Plan Goal, if a resident has the hand coordination to pick up thin playing cards, is that he or she will actually be able to play the Concentration Game with a limited number of regular playing cards, for example, two queens and two aces. Your resident will probably have more success if you pick cards that are quite different visually. Rather than the seven and the eight, pick an ace, a ten and a king, for example, so your resident can easily discriminate between the cards. A slide on the last track of the DVD illustrates a resident playing a Concentration game with a limited number of regular playing cards. Then, leave in a labeled Activity Project Bag in resident’s room.
Approach: To select cards that are visually different, i.e. the ace, 10, and King…
In summary, the ways to vary the difficulty level of the Concentration Game are:
a. Number: Increasing or decreasing the number of cards you place in front of the resident.
b. Position: Changing the positioning of the cards on the table in front of resident from an asymmetrical positioning to a symmetrical positioning, which makes the game more difficult.
c. Thickness: By using normal playing cards, which are made thicker by pasting corrugated cardboard to the back of the card to facilitate easy picking up of the cards for residents with stiff fingers.
d. Visual Cues: By using a limited number of normal playing cards that are visually different.
Now, one of the hidden problems…
with the Concentration Game, if you have someone who is alert enough to be aware of the subtle rules and who has an attention span to do the Concentration Game, is they usually need some type of secondary motivation. So, Care Plan Approaches might be as follows.
Approach: To continually inform the resident that the Concentration Game is good way to keep mentally alert…
Approach: To remind the resident the Concentration Game is a good way to keep their fingers flexible…
Approach: If the resident has no dietary restrictions, give you Mabel a marshmallow when she has completed the
game.
Other rewards listed in the approach might be a back rub, or read a Bible verse, depending on what is appropriate related to your Mabel’s interests.
Residents with whom to try Concentration Game
| Resident | Who will gather materials and/or construct project? |
Staff /Volunteer to work with resident? When? |
|
|
|
|
|
|
Progress Note: See page 7 for details regarding this four-part implementation procedure, which can become the basis of a Progress Note, stating “When I tried a Concentration Game with _________________, the following occurred… |
1. Observation: |
2. Assessment: |
3. Creativity: |
4. Sensitivity: |
Culture Change Implementation: Place Concentration Game in labeled Activity Project Bag left in resident’s room for CNA, etc. use.
Creativity - an 8 Step Method
Let’s take a detour for a moment to expand upon the “Creativity” portion of the four-part implementation procedure above. Remember the goal is to help your resident to succeed and to provide your Mabel with an activity that is just enough of a challenge to feel like she has accomplished something. Obviously, if the activity is too simple, your resident will feel insulted, depressed, and degraded. And if the activity is too hard, she will feel a sense of lack of accomplishment and possibly she will feel defeated. That’s where the Creative side of your brain needs to kick in.
The real key to providing Mabel with an activity that fits her mental and physical capabilities, is finding what is the right level of adaptations or assistance for her at this time. As we know, sometimes your Mabel reacts totally differently in the morning than she acts in the afternoon. So with each activity session, make it a habit to
1. Ask yourself, “Where is Mabel as I am working with her for this particular session?”
2. Then, take a deep breath, relax, and access the creative side of your brain.
The reason why I say to relax first is because the creative side of your brain works best when you are not scrambling through a massive amount of self-talk.
--By "self-talk" I mean, for example, "I'm late for Care Plan Conference!" "I'll never get all this paperwork done!" "That's right, I have to pick the kids up from soccer tonight!"
--So, you need to consider the following to creatively adapt the project to the appropriate level for that session…
Eight Steps to Creatively Adapt a Project
1. Clear your mind.
2. Step back mentally from the resident to gain a new perspective.
3. Observe and define in your mind what parts of the project he or she is able to do.
4. Observe the parts very specifically that he or she is not able to do.
5. Appropriate level? Is there any chance at all this activity will work? Clearly, if the resident is eating the cards in the Concentration Game explained above, the activity is far above your Mabel's ability level.
6. Best materials? However, for example, if she sort of grasps the idea of the shapes but cannot slide her index finger under the thin playing card to flip it over, glue corrugated cardboard onto the card, as mentioned above. Or is there another way to adapt the materials?
7. Best positioning? If her work surface were higher, lower, closer, further away, would your Mabel do better? If the cards, in this case, were placed further to the right or further to the left of her work surface, would this better accommodate a one-handed Mabel with extremely stiff arm and shoulder mobility?
8. Timing? When am I doing this activity with my Mabel? Is she tired right after eating lunch or more energized? Would mid-morning be better? Would late afternoon be better? Would just before lunch be better?
Volume Four in this Series deals with twenty-five ways to motivate your most unmotivated residents. The manual expands on the above idea of Creativity via the "Elephant Story." In that course, I make an analogy concerning a resident I was stumped on regarding thinking of an appropriate activity program. I related my "feeling stumped" to the fable regarding three blind men and an elephant. Some of my most creative thoughts regarding these projects, presented to you in these Five Volumes, occurred to me while I was driving home in my car from a consultation at a facility or a seminar I had instructed. When I had this "down time" to relax and reflect back upon the residents I had interviewed or a particular idea, I could more easily access the creative side of my brain. So if you are stumped on your Mabel, think about her during your drive home, or a commercial break on TV, or as you are walking into the facility from the parking lot, or…. "well… when?" You complete this sentence with what would work for you to find "down time" to access the creative side of your brain. Oh well, enough of a detour regarding the method I use for creatively thinking of adaptations to enable residents to be successful. Now, let’s look at Same and Different Cards.
Same and Different Cards
Same and Different Cards are a good activity for a resident who has a similar ability level to that needed for the Concentration Game. The idea behind Same and Different Cards is to ask your resident, "Is the shape on the left the same or different from the shape on the right?" You then have the resident create two stacks of cards. One stack has the Cards that have the same shape on both the left and the right. The other stack contains the cards that have different shapes on the left from those on the right of the card. To make your set of Same and Different Cards
1. Cut corrugated cardboard J into rectangles about six by eight inches.
2. Glue construction paper to the cardboard.
3. Down the middle of each Same and Different Card, draw a line with black marker dividing the card in half.
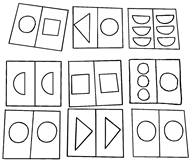 4. The illustration shows the shapes in my set of Same and Different Cards. Unlike the Concentration Game in which the shapes are drawn with a marker pen, these shapes have been cut from construction paper in various colors.
To start the activity first, of course, as mentioned numerous times previously, you…
1. Get eye contact.
2. Get at the resident's eye level.
3. Introduce yourself.
4. Assess hand coordination by asking the resident to place his or her hand in yours.
5. Depending upon your knowledge of the resident, you might ask him or her a simple orientation question to assess his or her alertness level at the moment. You might ask, for example, "What did you use to do for a living? What's your favorite food? Do you have any children? Are you from (city name)?"
Observe and Assess!
I always start off with one of the easiest Same and Different Cards, which is a square on the right, and a circle on the left. See first illustration in row 1 above.
1. Ask an open-ended question, "Frieda, what do you see here?" At this point, you are assessing whether she can see what the shapes are. Of course, you are hoping Frieda will say something like, "That looks like a square. That looks like a circle."
2. If she is able to name the shapes, then ask, "Frieda, does the pattern on the left look the same or different from the pattern on the right?"
3. Hopefully, Frieda will respond, "Why they look different to me."
4. You then say, "Let's put that in a stack over here." Place it to the left of your pile. (Note: You only show Frieda one card at a time. The illustration to the right only shows all of the Same and Different Cards spread out so you could see the shapes in my set to give you some ideas for creating you own set.)
Next, try the half-circles. This card has a half-circle on the left in purple or some other bright color, and a half circle on the right in the same color. Follow steps 1-4 above. Next, show Frieda the card with two circles. Hopefully, she will start to get the idea of comparing the left side to the right side. Next, show her the card with a triangle on the left, and a circle on the right. Ask, “What do you see here?” Hopefully, she will respond something like, “That looks like a triangle and a circle.” If you feel appropriate, then ask her, “Would we put that in the ‘same’ pile, or the ‘different’ pile?”
Color Causes Confusion
If you decide to vary the colors of your shapes, for example with a green circle on the left and a purple circle on the right, that introduces another variable. So in one respect, the card would be placed on the different pile, because the circles are different colors. But if your resident is unaware of the color difference, he or she might request for you to put them on the ‘same’ pile because the shape is the same. They are both circles. So depending on your criteria for exactly what is the same and what is different; after creating my initial set of Same and Different Cards, I felt it would have been a wiser choice to not have introduced color as a variable, and kept all of the colors the same. If you recall, I made the same color mistake with the Activity Apron, introduced in Volume Two of this series. My initial Activity Aprons had a holiday print on them. However, I found the Activity Aprons were much more effective when they were made from a solid fabric which enabled the resident to clearly see the item on the Apron. So the Activity Apron, and Same and Different Cards, are two examples of less is more.
Goal: To play Same and Different Card mental stimulation game independently once started…
Approach: Sort though 3 Same and Different Cards with the resident to review the concept for her then
encourage her to sort 2 or 3 cards on her own.
Creativity! Clearly, I selected the shapes in the above illustration randomly. I am confident that after having listened to the CD in Volume One and viewing the DVD in Volume Two and this Volume, as well as reviewing the respective Manuals; you will be able to come up with not only different Same and Different Cards, but better Same and Different Cards than I have thought of. Why stop at shapes? What about getting two identical magazines and making a set of Same and Different Cards for your Frieda with pictures? What about Same and Different Cards with words on them that are significant to your resident? Cards with the resident's hometown printed on it or family members' names? As you know, reading is in your Frieda’s long-term memory. Thus, reading is one of the last skills to be affected by Alzheimer's. Create and improve upon the basics that I am presenting to you here. Use this concept as a springboard. Then, leave in a labeled Activity Project Bag in resident’s room.
Residents with whom to try Same & Different Cards
| Resident | Who will gather materials and/or construct project? |
Staff /Volunteer to work with resident? When? |
|
|
|
|
|
|
Progress Note: See page 7 for details regarding this four-part implementation procedure, which can become the basis of a Progress Note, stating “When I tried Same & Different Cards with _________________, the following occurred… |
1. Observation: |
2. Assessment: |
3. Creativity: |
4. Sensitivity: |
Culture Change Implementation: Place Same & Different Cards in labeled Activity Project Bag left in resident’s room for CNA, etc. use.
NCCAP/NCTRC CE Booklet
Forward to Section 23
Back to Section 21
Table of Contents
Top