ActivityProfessional.Com Login


renewal cycles. Complete
some now & some later.
and Get 25% off
the Total price!
Buy 3 Courses
and Get 30% off
the Total price!
Buy 4 Courses
and Get 35% off
the Total price!
| Create Account | Login | |


Section 19
The Three Piece Puzzle
Table of Contents | NCCAP/NCTRC CE Booklet
 The Three Piece Puzzle is exactly what it sounds like. You glue construction paper to a piece of corrugated cardboard. Then glue a magazine picture to the construction paper. Sizes vary of course, but an easy size for residents to handle is approximately 6" by 10". Then cut the picture in two or three pieces.
Observe and Assess!
Here's the magic… There are literally an infinite number of ways to adapt the difficulty of your Three Piece Puzzle. By creating the puzzles yourself, you can custom make your puzzle to fit the ability level of your resident.
1. Number: First of all, you can of course vary the number of pieces in the puzzle. You can have a two piece, three piece, or even seven piece puzzle. Thus a progression of difficult is reflected in the following Care Plan Goals.
| Goal: To assemble a Three Piece Puzzle… |
Goal: To assemble a Four Piece Puzzle… |
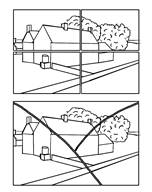
 2. Shape: Secondly, you can vary the shape in which you cut the pieces. For example, a four piece puzzle, cut in rectangular shaped pieces is by far much more difficult to put together than a Three Piece Puzzle cut into a “Y” shape, illustrated at the left. When the resident works with the “Y” shaped puzzle, he or she can figure out how to put the puzzle together, provided that they have the mental capability to do so, by looking at the configuration or shape of the pieces without having the ability to recognize the content of the picture. However, when all the pieces are the same shape, the resident needs to rely on the visual cues of the picture’s content for assembling the puzzle. Thus a progression of difficulty is reflected in the following Care Plan Goals.
| Goal: To assemble a Three Piece Puzzle with irregularly shaped pieces… |
Goal: To assemble a Four Piece Puzzle with symmetrically shaped pieces… |
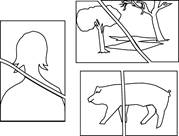
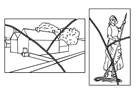
3. Content: A third way to vary the difficulty of the Three Piece Puzzle is to vary the content of the picture. The easiest puzzle to assemble is a puzzle that contains one central object. For example, I have a puzzle in which I took a picture of a girl, cut it out, pasted it on construction paper and pasted this on corrugated cardboard. I then cut it into three pieces. Obviously, by having one central object on a plain background, it is much easier for the resident to assemble than, for example, a picture of a pastoral scene with a barn, road, grass, trees, and sky in it. Thus a progression of difficulty is reflected in the following Care Plan Goals. As you can see, custom-making a puzzle for a resident based upon the resident’s past experiences enhance the CMS concept of “Person Appropriate” activities.
| Goal: To do a Three Piece Puzzle with one central object and plain background… |
Goal: To do a Three Piece Puzzle with numerous objects in it… |
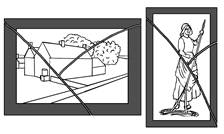 4. Border: When you start to assemble a puzzle, what is the first part that you do? The border, right? So another way to vary the difficulty of the Three Piece Puzzle is by putting a border around the edge. This is a step lower in difficulty than a puzzle with no border. Note the girl and barn puzzles illustrated to the left. As you can see, a wide border around the edge makes the pastoral scene that has multiple objects in its content much easier to assemble. You might take your magazine picture of a nature scene, for example, and paste a thick 1/2", 3/4", or 1" bright red or blue or gold, etc. border around it. To affix the border, you can paste construction paper strips along the edge of the picture first, then paste it to corrugated cardboard. Or paste your magazine picture on top of a piece of construction paper larger than your magazine picture. Then paste the construction paper onto the corrugated cardboard.
Contact paper: I always cover my puzzles with clear contact paper. Clear contact paper can be purchased at a discount store or hardware store in house wares with shelving or storage supplies. The reason for its location in the shelving department is that some people line shelves with clear contact paper. However, if you have a resident who has visual problems, the clear contact paper, even though it makes a nice durable surface, can cause a glare. For this reason, you might have an assortment of puzzles, some with the clear contact paper covering over the top and others without.
So far we have discussed four ways to vary the difficulty level of the Three Piece Puzzle by varying: the number of pieces, the shape of the pieces, the content of the picture, and the addition of a colorful border. Now let’s talk about thickness.
5. Thickness: Another way to vary the difficulty of the Three Piece Puzzle is by altering the surface upon which your magazine picture is pasted. Many residents, as you are well aware, because they have stiff, rigid fingers, have problems picking up flat items, especially if these items are thin. Therefore, an approach you might have for a resident who has stiff fingers could be…
| Approach: To mount the Three Piece Puzzle on three thicknesses of corrugated cardboard, rather than a single thickness of cardboard. |
Ideally, perhaps after your resident has been doing an activity like Spool Winding, and their fingers became more limber, you might have an initial goal as follows…
| Goal: To assemble a Three Piece Puzzle with three thicknesses of cardboard… |
Later the revised goal might be…
| Goal: To assemble a Three Piece Puzzle with one thickness of cardboard… Approach: To provide the resident with a Spool Winding hand exercise to increase the mobility in his/her hands (or to decrease the stiffness in his/her fingers…) |
Step-by-Step Implementation of Puzzle
In order to assess a resident regarding the appropriateness of a Three Piece Puzzle, as mentioned earlier, the first thing that you do is get eye contact and get at your resident's eye level. I like to use a folded piece of foam carpet pad to kneel on in order to acquire the proper eye level. This folded piece of carpet pad is explained in further detail in Volume Two of this Series. Then assess how alert your resident is at this specific time of day, on this particular day. As explained earlier, you might ask the resident a question after introducing yourself to assess their orientation. You might state, “Hi, my name is .... What is yours?” The purpose is to assess if he or she is able to respond to a simple question. By asking a simple question, you can quickly assess their alertness level at this time, which of course can vary from minute to minute.
Apraxia Assessment for Three-Piece Puzzle
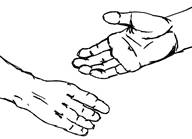
After gaining eye contact, if they seem to respond somewhat appropriately to your introduction and questions, the next thing to do is to ask the resident to place their hand in yours, as mentioned earlier. As you know from your Activity Director's Basic Training Course, Apraxia is a neurological disorder characterized by loss of the ability to execute or carry out learned purposeful movements, despite having the desire and the physical ability to perform the movements. Thus, residents with Apraxia are often unable to perform simple motor tasks or to understand. Therefore, ask yourself: does this resident understand the request to place their hand in mine? Then assess their ability to close and open their hand. I ask “Can you close and open your hand like this?” and I demonstrate. Once again, I am assessing their cognitive ability to follow a simple request as well as assessing their hand movement to see if they are able to bend their fingers enough to pick up the pieces in the puzzle.
I then provide a work surface, usually an over-the-bed-table. Try to adjust the over-the-bed-table as low as possible to facilitate the angle of your resident’s elbow and hand, without putting pressure on their knees. Work surface height is discussed in detail in Volume One of this series.
Observe and Assess!
The next step is to put the pieces of the Three Piece Puzzle together placed on the table. The easiest one I have found to start with is the Three Piece Puzzle with the pieces cut in a "Y" shape.
1. Looking at the assembled puzzle, state, "I have a picture for you to look at. Would you like to look at a picture for me today?"
2. Then ask an open-ended question to assess your resident’s understanding. Point to something in the picture and ask, “What do you see here? What is this?”
3. If they are unable to name an object in the puzzle picture, you might use a “Sesame Street” type technique whereby you leave out a word.
a. For example, ask, “What is this here? This is a ----” and then point to the sky in the assembled puzzle picture.
b. "Let's see, what is this? Hmmm."
c. Give them descriptors, like, “It’s up above your head, it’s blue, it has clouds. What do you call this?”
d. An effective way to word your questions and statements is as if you cannot think of the word. It sort of leaves a cognitive hole for the resident to fill in, and hopefully your resident will say the word “sky.”
e. In order to do a Three Piece Puzzle, your resident needs to at least have an idea of a picture or some concept of a whole and its parts.
f. If they don’t answer “sky,” then ask them if they can say the word “sky.” Once again assess the ability level of the resident. Staff working with the Three Piece Puzzle might need to monitor their voice tone to make sure their verbiage with the resident is not demeaning or child-like, preachy or school-teacher like, but stays in an adult trying-to-help frame.
4. Next ask, “What does this look like to you?” Point to another part of the picture.
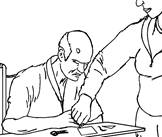
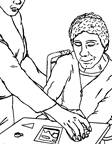 As mentioned previously, make sure that, if you are right handed, that you are working to the resident’s right, as illustrated. If you are standing or kneeling to the left side of the resident and you are right handed, your right forearm most probably will be in your resident's line of vision, as illustrated. This is a very easy mistake to make, and disoriented residents in most cases will be unaware their field of vision is being blocked, and they will not be able to say, “Will you please get your arm out of my line of sight? I cannot see the puzzle.” Therefore make sure that you are working to the resident’s right if you are right handed or to the resident's left if you are left handed.
5. Then point to another object in the picture, for example, a tree. Ask “What do you see here?”
 6. Successive Approximation: I had a resident respond with the word “leaves” and not “tree.” However, I replied, “Good, great, you did a good job! Boy, we could use some leaves on the trees now!” It was March when I was showing the resident the picture. The key principle to retain and use here is whenever a resident gives any type of appropriate response or close to an appropriate response, compliment their response and find some way to make it correct. The technical term for this is called “successive approximation.” You are doing a "successive approximation" when you reward with verbal praise any attempt, response, or approximation your resident makes regarding the activity you are conducting.
| Goal: To name the item in a Three Piece Puzzle picture… Approach: To reward successive approximations or attempts to name the objects in a Three Piece Puzzle with praise… Approach: To reward with verbal praise attempts to say the correct name to the picture… |
The next step in implementing of the Three Piece Puzzle, after the resident appears to be aware of the puzzle picture, is to…
1. Slide one piece of the puzzle away about 2 or 3 inches while it is still on the working surface and then to slide it back.
2. Usually using very few words is more effective, because a lot of verbiage often distracts the resident who is at the level with which the Three Piece Puzzle is appropriate.
3. Then repeat #1, slide the piece away again, and then slide the piece back again, usually without talking.
4. Next, take your resident’s hand, if needed, and grasp by the wrist, and assist your resident to slide it away and slide it back.
5. Then, release his or her hand and ask, “Can you do this?”
I’ve had many residents who can slide the piece back after following the five steps above, and I have slid it back and away several times. If you have any indication at all of an effort on your resident’s part, a successive approximation, be sure to respond with a compliment. For example, say, “Good! Great, good job! You really did a good job here. You’re really doing a good job at this. You must have done this before.” Say whatever you can think of to indicate genuinely in your tone of voice that your resident is succeeding.
Goal: To replace one piece of the Three Piece Puzzle while still on the working surface… |
The next step in implementation of the Three Piece Puzzle is to slide two pieces of the Three Piece Puzzle back out of position, about 2 or 3 inches. And then slide them back into place. If your Millie needs assistance, take her index finger or hand and help her to slide the pieces back into place.
Approach: To discuss puzzle picture and demonstrate sliding two pieces away, before asking resident to replace
two pieces of the puzzle…
Observe and Assess!
With each of the preceding steps, you are assessing if the Three Piece Puzzle is too difficult. Here’s how you assess if this activity seems to be appropriate for your resident's cognitive ability level and attention span.
-- Notice your resident's eyes. Are they looking at the pieces you are moving?
-- If they have an unfocused, glazed over, or blank stare at the puzzle, you might try Caps-in-a-Bowl described in track three of the DVD, and described in detail in Volume One of this series.
-- On the other hand, perhaps a puzzle more difficult like a seven or an eight piece puzzle might be appropriate if the Three-Piece Puzzle seems far too easy.
Observe and Assess for a Quantum Leap in Difficulty
Interestingly enough, there is a huge jump in difficulty between keeping the puzzle pieces on the work surface and taking all three pieces and handing them to a resident and saying, "Can you put this together?” Oftentimes if the resident does not see the picture as a whole first, they will not have any idea what to do with the pieces and may just look at you blankly. If this happens go to the simpler level described above of …
1. showing your resident the picture as a whole and asking them to name items in the picture, with as much prompting as needed to be successful…
2. sliding one, then two pieces away and back repeatedly.
If your Millie is able to succeed at the simpler level of sliding pieces away and back again, remove one of the pieces from the work surface and hand it to her, to see if she is able to place it in the correct position in the puzzle.
In review, in working with a Three Piece Puzzle you can adapt this activity by varying the number of pieces, the shape of the pieces, the content of the puzzle, and the border around the puzzle, as well as the thickness of the pieces. The Care Plan Goal and Approach combinations are endless with these. Here are a few to get you started.
| Goal: In three months, to do a Three Piece Puzzle with an adaptive border… |
Goal: To do a Three Piece Puzzle without an adaptive border… |
Goal: Within three months to do a Three Piece Puzzle with one central object… |
Goal: Within six months to do a Three Piece Puzzle with several objects in the picture… |
Goal: In three months to do a Three Piece Puzzle with irregularly cut pieces… |
Goal: To do a four piece puzzle with symmetrically cut pieces… |
Goal: In six months to do a five or six piece puzzle… |
Residents with whom to try a Three Piece Puzzle
| Resident | Who will gather materials and/or construct project? |
Staff /Volunteer to work with resident? When? |
|
|
|
|
|
|
Progress Note: See page 7 for details regarding this four-part implementation procedure, which can become the basis of a Progress Note, stating “When I tried the 3 Piece Puzzle with __________________, the following occurred… |
1. Observation: |
2. Assessment: |
3. Creativity: |
4. Sensitivity: |
Culture Change Implementation: Place 3 Piece Puzzle in labeled Activity Project Bag left in resident’s room for CNA, volunteer, etc. use.
NCCAP/NCTRC CE Booklet
Forward to Section 20
Back to Section 18
Table of Contents
Top